A MYSTERY resolved: Depth of Field, Aperture & ND filters
OTHER PARTS OF THE SERIES SO FAR:
Essential kit for your Canon T2i/550D if you’re on a budget:
Part 1: Basic lenses
Part 2: Batteries, memory cards & bags
First of all: Sorry guys, I know it’s been a while, but I’ve been quite busy with some new projects I will be able to talk about soon.
So finally here is the third part in my series of essential T2i accessories if you’re on a budget. Today, I’m going to tell you all you need to know about shallow depth of field and how to achieve it, and that will lead us directly to aperture and ND filters.
Since I first posted my 550D / Rebel T2i test film “FEBRUARY”, I keep getting questions about how I achieved the very shallow depth of field look.
It’s of course all about physics, and I’ll explain the basics today – but we’re practitioners, so we need to know about how to achieve it, not how it works on paper.
Apart from their very high light sensitivity (compared to the usual video camcorders), one of the main advantages of these new Video DSLRs is their shallow depth of field look. All of us have grown up with movies and therefore we have learned that the image we see in cinemas is the “gold standard”. This gold standard was very hard to achieve until these cameras came up. Of course, shallow depth of field isn’t the only feature that makes an image look filmic, but it is very important and probably one of the most distinguishing features. (Another problem used to be the “interlaced look” of video camcorders until they became able to shoot progressive frames, just like film. And of course the 24 frames per second that we are used to from movies.)
So how do you get a shallow depth of field look?
There are three main factors influencing the depth of field:
1) The sensor of the camera has to be large. The APS-C-sized sensor inside the Rebel T2i / 550D is actually very similar in size to a 35mm motion picture still frame. Therefore, it is possible to achieve very similar results. A 35mm still sensor is even larger, and therefore the DoF is even shallower – currently, only the 5Dmk2 is able to achieve this in the DSLR video field.
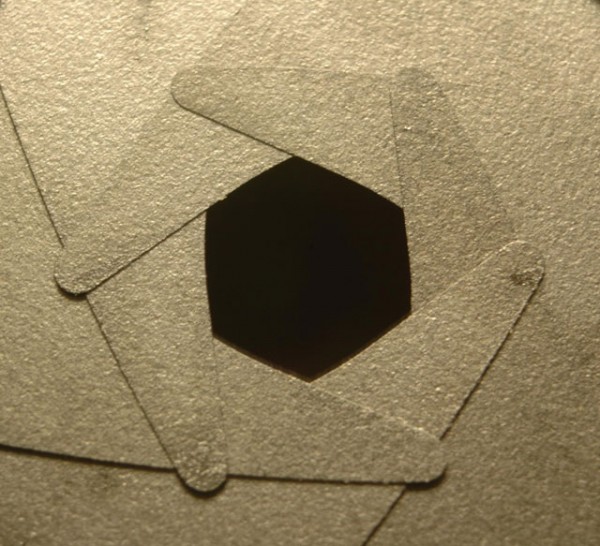
2) Wide apertures. I can’t stress this enough. It is essential that you use fast lenses that offer wide apertures. The wider the aperture, the shallower the depth of field will be. Smaller numbers mean wider apertures (e.g. f/2.8 is wider than f/3.5). Yes, these lenses are expensive, but you will be able to shoot in low light and have a very shallow DoF – both of which is hardly possible with cheap glass.
3) Long focal lengths. The longer the focal length of your lens, the shallower the DoF will be. When shooting “FEBRUARY”, I mainly used a 70-200mm f/2.8 lens, which effectively becomes up to a 320mm lens on the T2i/550D. (Because a full-frame 35mm still image sensor is even larger – like the one the 5Dmk2 offers – and that’s what those focal length info on the lenses always refer to. The T2i/550D as well as the 7D sensor offer a magnification factor of 1.6.)
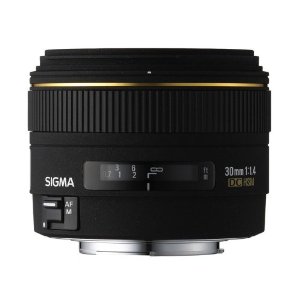
The Sigma 30mm f/1.4 EX DC HSM – a very fast, very sharp and very affordable lens for ambitious DSLR filmmakers – f/1.4 means it offers a VERY wide aperture which allows VERY shallow depth of field
Let’s focus on the aperture part today. When you are shooting stills, there are two ways to control the exposure (and therefore ‘brightness’) of your images: aperture and shutter speed. A wide aperture allows a lot of light to get into the camera, therefore the shutter speed can be reduced.
Photographers often work with either shutter or aperture priority mode on their DSLRs, where you can control one of the two and the other one will automatically be adjusted. E.g., if I want a very shallow depth of field look as a photographer but I don’t want to experiment with exposures, I will use aperture priority mode and open the aperture as wide as possible. The shutter will then automatically adjust to expose the image perfectly.
While the aperture controls how much light comes to the sensor, the shutter speed controls how long the sensor is exposed, i.e. how long the aperture stays open.
But this is the crucial difference between shooting stills and shooting video: You usually don’t change the shutter speed when shooting video at all. In most cases, it should stay at double the amount of the frame rate you’re shooting with (or as close to that as possible). E.g., when you’re shooting 25fps, shoot at a shutter speed of 1/50 to achieve the most cinematic motion you can get.
This is called the “180 degree shutter rule” and Tyler Ginter has a great blog online explaining this in detail.
You need to change the shutter speed when shooting video e.g. when shooting under fluorescent light (to reduce flicker) or shooting at higher frame rates for slow-motion (e.g. shooting 720p60 with the T2i/550D you should adjust shutter to 1/120).
So you might ask: How can you achieve shallow depth of field when it’s bright outside? You still have to shoot at a wide open aperture and can’t change the shutter speed, but that’s much too bright on a sunny day, so you have to step down the aperture to get a correctly exposed shot. But then the shallow depth of field is gone again. What to do?
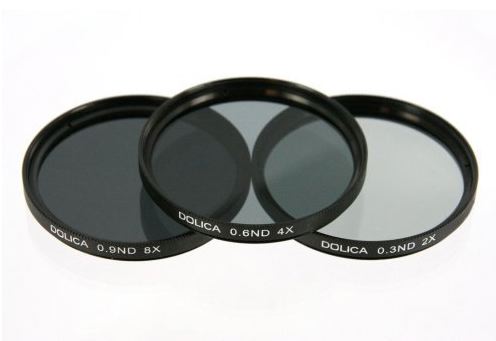
This is exactly where neutral density (ND) filters come in handy. ND filters reduce the amount of light reaching the sensor. This means you can achieve exactly the aperture setting (and DoF) you strive for using the correct ND filter!
Professional and semi-professional video camcorders often have two steps of ND filters built right into the camera. This is not the case with DSLRs – you have to buy them separately, but they are an absolutely essential purchase. I didn’t have an ND filter when shooting “FEBRUARY”, that’s why you won’t spot any shallow DoF shots in bright sunlight in this film – I had to step down and was only able to open up the aperture in shadowy or dark scenes.
There is a wide range of ND filters available – you can buy them in different intensities and different sizes/diameters. The sizes part is the one which can be quite annoying when using them on DSLR lenses: Many lenses have different diameters, so you need to have the same filter in different diameters to use them with every lens.
But there are great sets available that are not that expensive. ND filters are really an essential purchase for DSLRs, because they lack the built-in filters of ‘proper’ video camcorders.
Additional to the normal ND filters, there are now two great products that allow you to vary the amount of light going through. These are called Singh Ray Vari ND (B&H product link) and Genus ND Fader (B&H product link) and you can change the intensity of their light transparency by turning them.
Unfortunately, both products seem to be sold out at retailers currently. Be careful with purchases through eBay as there are many bad filter products floating around (often rip-offs with the same names but worse quality) and you don’t want to use a filter that shifts the color of your white balance (something that is very, very annoying).
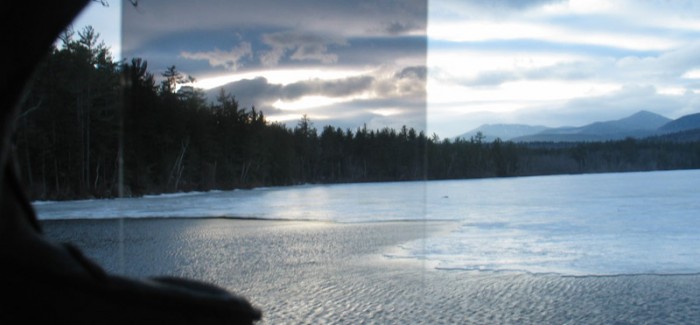
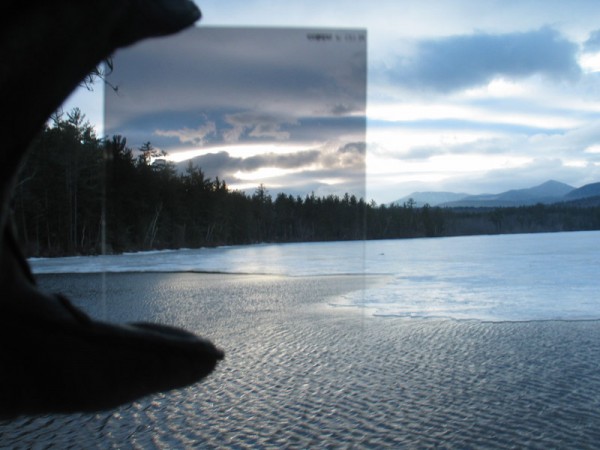
A specific variant of ND filters are graduated neutral density filters, called ‘ND grads’ by many. Part of the glass consists of a neutral density filter, which gradually (or abruptly) transitions into a clear glass part. This is especially useful for shooting landscapes, where the sky is often much brighter than the ground. These filters give you the possibility to expose evenly.
An alternative to all these filters are matte boxes that will immediately pimp the look of your DSLR to a serious movie camera 🙂 … but apart from reducing lens flares etc., these matte boxes are there to hold your filters. You won’t have to have a different filter for each lens with a matte box, but of course it’s an additional investment. I will take a look at those at some other time.
For now, I can suggest you have a look at the Genus matte box (B&H link) – I’ve tried it and I think it’s a great value for the money. The Redrock Micro DSLR bundles, e.g. the great Cinema Bundle are also worth having a look at, it includes a follow focus as well (also something I will cover in the future).
If you want to help me maintain this blog, I’d be grateful if you purchase through my affiliate links at Amazon or B&H Photo! Cheers guys.
Next time in this series, I’ll take a look at audio recording options for DSLRs and of course especially if you’re on a budget and use the Canon Rebel T2i / 550D.
OTHER PARTS OF THE SERIES SO FAR:
Essential kit for your Canon T2i/550D if you’re on a budget:
Part 1: Basic lenses
Part 2: Batteries, memory cards & bags
-
“currently, only the 5Dmk2 is able to achieve this in the DSLR video field.”
Nikon D3s is full frame and can record video too 🙂
-
Thanks so much for this post, Nino. Haven’t even thought about how essential these filters really are when it comes to shooting in bright day light.
I’m wondering though – what kind of nd filter should i buy? If I understood it correctly, there are different nd filters with different density out there; meaning they let through different amounts of light. So I’m wondering, do I need to buy 10 different filters and always find the right one by trial and error on the set? Or is there a kind of common nd filter that can be used in most situations?
Sorry for all the questions 😉
-
hey markus …
there are so called Fader ND filters out there
( http://www.lightcraftworkshop.com/site/page1000.aspx ) … you can shift for example for example form ND2 to ND 400 … works great.
-
-
Nino, great blog post! I ran into this same problem (quoted below):
“Many lenses have different diameters, so you need to have the same filter in different diameters to use them with every lens.”
And a friend of mine led me to the solution–“step-up” or “step-down” rings. I had only a 62mm Tiffen ND filter & didn’t want to spend for an additional 52mm ND. So, voilà, the step-down ring! They are very cheap, very simple to use (they are double threaded–screw one side of ring on to lens then screw ND onto other side of ring), & can be bought at any camera store or online. You can then use the same ND filter (or any other filter) on multiple lenses. I hope this helps!
-Stephen
-
Nino, great job. Thank you for informations.
You rule!
Have fun,
Simon
Slovenia -
I really appreciate this awesome info. I just got my Canon t2i and trying to learn more about it. I will make sure to use your links when I decide to purchase more accessories for my camera , and I know I’m going to. Once again thanx, and keep up the good work mate!
-
Thanks for this great info! Am looking forward to the audio part.
-
Dear Nino,
Great article on the T2i. Highly informative.
I’m a starter in the DSLR arena and lenses.
I have bought the Canon 50mm f/1.4 USM Lens.Could you please tell me which size ND Filter should I buy for this lens?
Thanks in advance.
-
great blog.
i have spent a number of minutes trying to figure out the exact lenses and combinations (filters) used in february. Am i missing something? I saw the post where you show your $30 lens and the more expensive one, is the $30 lens such crap that you drank from it? or does it have useful and mind-blowing applications.
thanks in advance
james
PS. in prep for our third film, first one came out last year on warner brothers, about to finish number two. need to know all this cool new stuff you are writing about…thanks
-
Hey Nino,
First of all I am so thrilled to have found this site. I recently was set to purchase, although a bit nervous because of price, a 7D. Then I came across the lil oh 550D and I instantly knew this was the cam built for me and what I’m trying to do, video on a budget.
This site was the perfect 2nd find after the 550d. Ive read all your articles and am very happy knowing I made a good choice. I especially like the your cons article about video on dlsr, as I am a very technical person and this helped me understand that video on DSLR isnt perfect like I thought it was..
Anyway from what Ive gathered I think Ive settled on the The Sigma 30mm f/1.4 EX DC HSM that you recommended..But my one question to you is that there is also a 50mm version of this lens out now by Sigma..would that be the better buy? in this part of your guide you state that the longer the focal length the better DoF…so in that regard should I get the 50mm over the 30mm? Any insight or opinions would be greatly appreciated. Thanks for being a pioneer with the 550D nino, I am even more excite to own this cam thanks to this site.
Jason
-
Sorry if this isn’t exactly this feature’s purpose, but could you do a piece on sound equipment to use in conjunction with the Rebel T2i?
-
I just got a 77mm Fader ND – and it is brilliant – I decided to get a larger ND filter and get a variety of stepper rings for my lenses, so I wouldn’t struggle to fit it on future purchases.
-
Hi,
I just thought I’d leave a note for the person asking about sound equipment for making his DSLR film.
Unless you are doing very specific kinds of news coverage:
1. Do not use the onboard mic
2. If at all possible get the microphone and the recording equipment off the camera and use a boom and good hypercardiod or shotgun mic.
3. The quickest way to alienate viewers of your film is to have bad sound. Seriously. This will make them leave even before bad acting or visuals.
4. This is what I purchased and it’s worked very well for me:
a) The Oktava MK102a mic. It’s an excellent and inexpensive film mic. Something of a legend for price/performance in the indie world.
b) A decent boom. You can get them with or without an internal mic cable channel. A good basic Gitzo carbon fiber pole will run about $175.
c) A suspension bracket to mount the mic on the boom and reduce vibration
d) A protection “blimp” and “dead cat” fuzzy cover for the mic to reduce/eliminate wind noise.
e) A good digital field recorder with balanced inputs. The Zoom H4n is currently the price/performance king.This would be enough to get your started.
eris
-
thanks for the tips eris 🙂
-
-
Hi,
I recently purchased a T2i and can’t decide between the sigma 30mm f/1.4 and the Canon 50mm f/1.4. I will be making a lot of short films and movies so what would suit me best? What is the difference?
Thanks,
Kyle
-
I have read this blog and is great information you can find in here. But writing down the accessories (mainly lenses) and their prices and then summarizing everything it seems it will get me in the same price range a panasonic hvx 200 would be. And then that camera is a dedicated movie camera with more features and better quality (?).
Is there anywhere a comparision between panasonic hvx 200a and the T2i + good lenses? -
I wanted to thank you for your 3 part introduction into DSLR filming. I will be receiving my T2i tomorrow and cannot wait to try out some of the many techniques you have mentioned in your blogs. As someone who knew very little about taking this step, I found all of the information extremely helpful. Thanks again… I look forward to reading more! I must say I’m almost sick to my stomach knowing how many thousands of dollars I’ve invested in professional hd cameras that don’t even come close to the video quality!
-
Have you had any experience with the Polaroid brand
variable filters? It looks like they were just added to Amazon in
the past couple weeks, but they’re super affordable…
http://www.amazon.com/Polaroid-Optics-Variable-Neutral-Density/dp/B004GYXRK6 -
Hi Nino…
Awesome and very useful site for any dslr starter. I really liked it and I appreciate ur efforts.
I have three questions in my mind. Hope u will guide me to solve.
1. can i use 550d to shoot a film for theatrical release?
2. I am planing to buy some lenses and selected these.
a. Tamron AF 17-50mm F/2.8
b. Tokina 11-16MM F/2.8
c. Canon EF 50mm f/1.8II
d. Canon EF-S 55-250mm IS Lens
can u tell me if all above are necessary or i can avoid any one or two of them?
Which size ND Filters i should use for these lenses ?3. Any suggestions to shoot car chase aur high speed motions with 550d?
Thanks in advance.
🙂 -
Superb post! Been trying to search for some useful information about ND filters, but couldn’t find anything less complicated. I admire your simple and straightforward style of explaining technical stuff. Keep the great stuff coming! All the best 🙂











Comments