A Resolve 9 Red R3D Grading Workflow [guest post]
This is a guest post by Markus Weilguny, an industry professional based in Vienna. Check out his website at markus.freelaxing.com.
Foreword
I have been working on grading projects for a while, and I am constantly looking to improve my workflow and technique. In my search for current R3D workflows, I am quite surprised that a lot of people still propose to render from RedCine to ProRes/DNxHD and never go back to the original R3D raw files for final mastering.
So in case you are not sure about your R3D workflow, here’s the run-down of my personal approach to working with R3D in the hot-off-the-shelves Blackmagic DaVinci Resolve 9.
If you have any comments, I’d be happy to hear them!
Getting the most out of your R3D Footage
To get the best looking results from your hard-earned footage, it makes sense to master on the original R3D raw files without loss of quality due to transcoding.
Of course, even on current systems, going through the entire editing process with raw footage is not the most efficient way to work. It makes sense to edit on a light-weight format and reconform to R3D for grading and deliverables.
Overview
I move from dailies selection and first light in RedCine to ProRes editing, export the edit as an XML, reconform and trim the R3D files in Resolve, where I start to grade from the existing RMD first light.
Step 1 – Dailies and First Light in RedCine-X Pro
The goal here is to have files that you or your editor can use throughout the editing process.
Dailies
To sort through all the material on set (or after shooting), I use RedCine-X Pro, where I star and label takes (just press number keys, same as in Adobe Lightroom), set in and out points (I and O, duh), and do a first light rough grade for editing (to save your first light using Red Metadata, just select all your clips and RMB | Save RMD).
Rough Cut
If you have too much time on your hands on set, you can start with dailies editing in the RedCine timeline. You can export this pre-cut via XML to pretty much any editing software and make your editor owe you a coffee.
Export for your Editor
Finally, export your selected R3D clips to an edit-friendly format. Personally, I like working with ProRes and I like working fast, sometimes on multi-cam, sometimes on a laptop – so I prefer light-weight files because they can be moved from disk to disk quickly and keep my editing program responsive.
I find 1280 x 720 ProRes (LT) to be enough for most of my edits, sometimes when you have more client-interaction on big screens a higher res might be meaningful, but I find it’s easier to stay focused on the edit, instead of picture quality, on lower resolutions. You can always blow your client’s mind later in Resolve 9 with the 4K original footage 🙂
As for debayer settings, it depends on the availability of a Red Rocket and on how fast you need the files. Again, in the spirit of understatement, I find “Half Res, Good” does the job nicely and greatly reduces rendertime.
To recap
• Select dailies according to the log or do your own rating and in/out selection
• Grade (First Light) the selected clips
• Save RMD for all clips which you have graded
• optional: Start creating a timeilne for dailies + export an XML
• Export to ProRes or DNxHD (e.g. 720 LT, de-Bayer 1/2)
For Resolve lovers: Of course you can do your dailies, first light and source export from R3D files in Resolve too 😉
Step 2 – Edit
This one is self-explanatory, just edit with the ProRes files in your editing software of choice. When you are done, export an XML of your timeline.
Note: If you late discover that you are having troubles with the import in Resolve, try removing Effects, funky Transitions and speed changes.
Offline
Don’t forget to render an offline (an offline is a rendered clip of your finished edit, which you use to check the reconnected XML timeline in Resolve 9). In most cases, you’ll have a final version of your edit that has been OK’d by your client anyways, so you can use that file as the offline.
Send Audio to Mastering, e.g. via OMF. I’m just mentioning this because Resolve 9 now supports audio input 😉
To recap
• Edit
• Export XML
• Export offline
Step 3 – Move your Edit into Resolve
Finally! Let’s get started with the slick new interface (and miniscule fonts..)
The first goal is to load the XML timeline into Resolve and use the original R3D media instead of the .mov (or other) files used for editing.
Feeling Lucky …
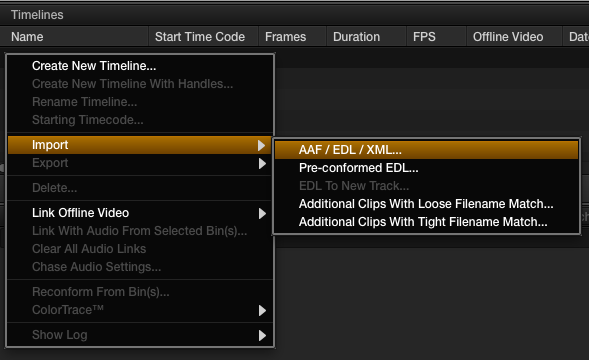
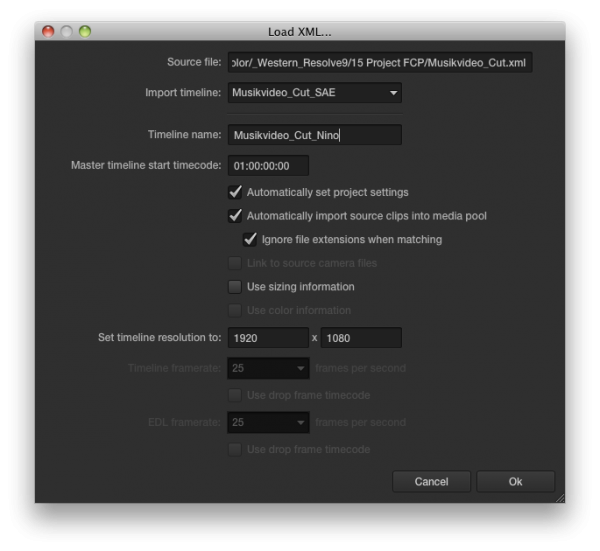
If you are feeling lucky, just create a new project and import your XML (hit Alt+Cmd+I or File | Import AAF, EDL, XML or head over to the Conform Screen and RMB in Timelines | Import XML).
On the import screen that opens, check “Automatically import source clips into media pool” and “Automatically set project settings”. On the dialogue that opens, point Resolve to the folder containing the original R3D media.
Using the sizing information from the XML might work for you as well, but sometimes you might have to do manual adjustments in the Format tab on the Color screen.
.. or on the Safe Side
In case you are missing some files in your timeline after importing, here’s the surefire way:
• Set your project settings manually using the button on the lower left corner
• Import the R3D files first using the Media tab at the bottom center of the screen
• Try importing the XML again
The awesome thing about reconforming in Resolve is that the final edit (which was using .mov files) is automatically linked to the original R3D files.
Compare to the Offline
Just to be safe, we will import the offline, so we can compare the rendered version with the reconformed timeline to spot any differences that might have been caused by the import.
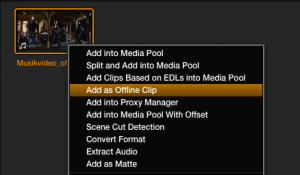
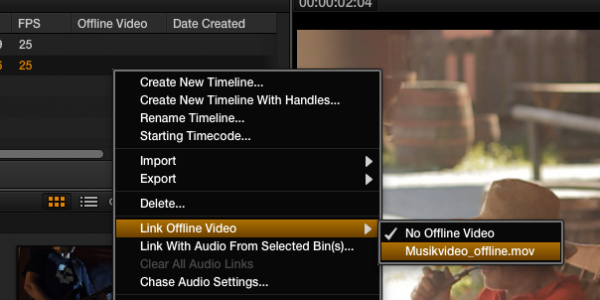
First, import the offline into your media pool. In the Media tab, RMB on the offline and select “Import as Offline Clip”. Then head over to the Conform tab, in the top left corner find the Timelines and RMB on the reconformed XML timeline, then select “Link Offline Video” and select the newly imported offline.
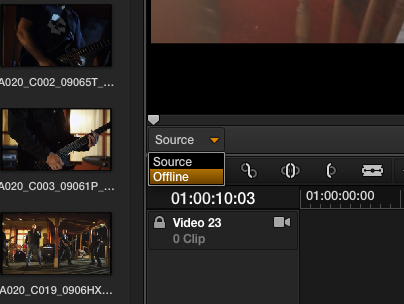
To actually compare the timelines, you need to switch the small dropdown beneath the left-hand viewer in the Conform tab from “Source” to “Offline”. Now you should see the offline on the left, and the imported XML timeline on the right. Skim through to check for differences and make changes in the timline if you have to.
Still missing Files
In the example I am using for the screenshots, I have included one file that was shot on a Canon Eos 7D which resides in a different folder than the R3D files. Obviously, by pointing Resolve to the R3D sources, it could not find the 7D .mov file. To solve problems such as this, go to the Media screen, import the .mov and head over to the Conform screen. Resolve might automatically relink to the newly imported media.
In case it does not:
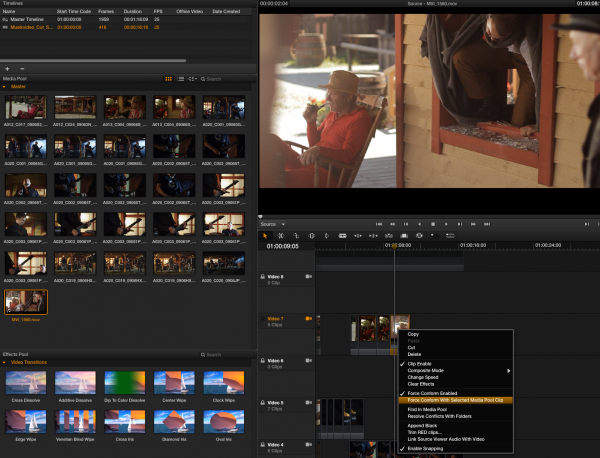
Select the .mov, unlock the video track with the missing file (just click on the lock icon), RMB (right-mouse-button) click on the clip and choose Force Conform with selected Media Pool Clip.
To recap
• Import XML with source clips and project settings
• Import offline (Media tab | RMB | Add as Offline)
• Assign offline (Conform tab | Timelines | Link Offline Video + dropdown )
• Check for differences between the offline and the imported XML timeline
(optional) Step 3.1 – Save Disk Space, Save the Environment
By now you’ll be lusting to grade, but lo and behold, there is one more thing to take care of!
To save on disk space, and even more importantly, disk load, a bit of file management can come in handy. And it’s really easy:
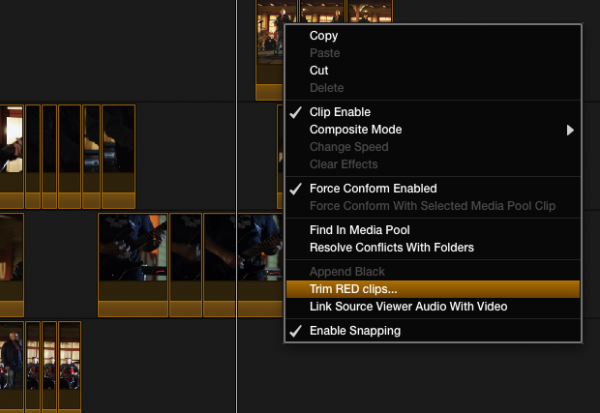
In the newly imported timeline, just select all your clips and hit RMB (right-mouse-button) | Trim RED clips…
Select a folder you want to export the trimmed files to, and hit OK.
Use RedCine Instead
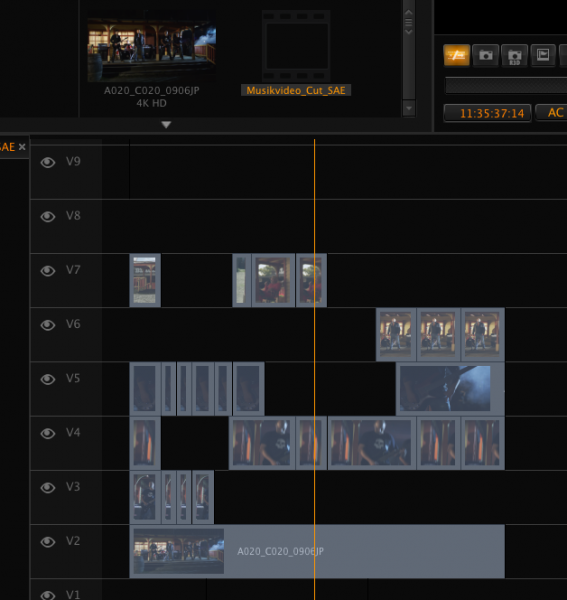
You can do the same step in RedCine-X Pro. Though I would recommend doing this right after exporting your XML and before reconforming in Resolve.
Just “Import FCP XML”, this automatically relinks to the original R3D files – simple!
Check to see if the timeline has been imported correctly, and we are off again:
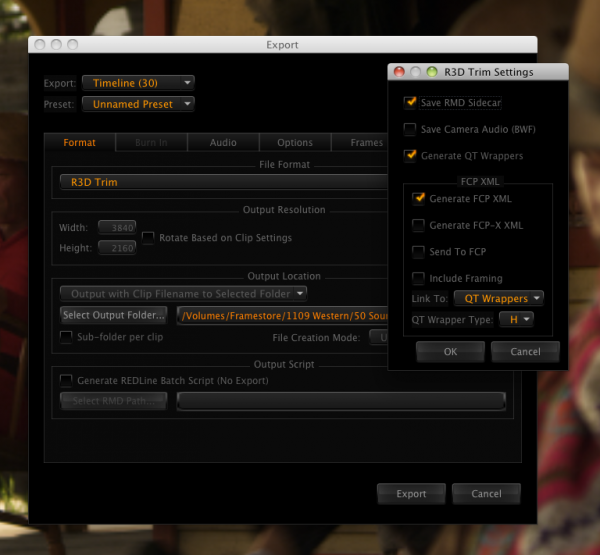
Hit Export, select Timeline and set to “R3D Trim”. This exports trimmed R3D files according to the XML timeline (similar to Media Manager in FCP).
You can make your life even simpler by checking “Include RMD” (to save your existing first light Grades) and “Include Handles” (because edit changes do happen 😉
The cool thing about trimming this way? The workflow for importing in Resolve stays exactly the same – you just use the original XML from your editing program! (praise be the timecode.)
To recap
• Trim R3D files in Resolve
• Or Import into RedCine and Export as R3D Trim with RMD and Handles
(optional) Step 3.2 – Where’s my First Light?
If you already have a rough grade in RedCine-X Pro, but forgot about it, or someone else in your team was motivated enough to create a first light, but not motivated enough to tell you about it, you just need to load the updated Red Metadata into Resolve 9.
RMD from RedCine
It seems a direct update is not actually supported in Resolve 9. Workaround:
• Save RMD in RedCine
• Reload the Project in Resolve OR
• Browse | Remove Media, and again: Add into Media Pool
Adjust RMD in Resolve
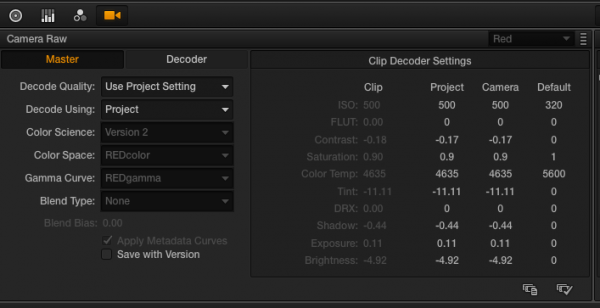
After successfully importing your first light, Resolve 9 will automatically use your Red Metadata (RMD) to interprete the footage. You can adjust these settings anytime on the Color screen in the left-hand Camera Raw tab.
To change RMD for several clips at once just selected the clips and click the Apply to all button in the Camera Raw tab.
Careful: The RMD refers to the R3D file (and will change all clips that share the same source file)
To adjust each shot as an individual clip, you need to trim your files into separate clips – just use the R3D Trim workflow as described above.
To recap
• Use first light from dailies as a starting point
• Adjust Red Settings in Resolve before grading
Step 4 – Grading-Time in Resolve 9
The world needs more pretty (and technically accurate) pictures – go have fun!
(optional) Step 4.1 – Edit changes do happen
When the editing capabilties of Resolve 9 are not enough (which now has keyboard layouts to match some editing programs), or your editor has an updated XML for you, it’s slick to relink in Resolve:
Just import the new XML, this creates a new timeline and through the magic of the Master Timeline (which stores all of your clips and grades), all your existing Grades should be automatically copied to the new timeline, because the timelines share the same clips and metadata.
To recap
• Import the new XML
Step 5 – Export and Impress
When all work is done or the deadline looms, it’s time for a wrap.
Just head to the Deliver screen and render as Target or Source (now called Single clip and Individual source clips) – now even with audio 😉
To sprinkle those finishing touches on your masterpiece, just take your rendered files back to your tool of choice and add Effects, Transitions, Titles, etc. (I hear Smoke 2013 has also benefitted from an interface lift..)
Conclusion
The workflow for grading R3D with Resolve 9 is a breeze: It’s simple, straightforward, yet flexible. Of course it’s not a one-button solution and there’s always room for improvement – so if you have any suggestions please drop me a line (or let the Blackmagic support team know about it too).
Happy grading
Markus
by
Markus Weilguny, MSc
markus.weilguny@gmail.com
Media Training: maya.freelaxing.com
Media Solutions: http://markus.freelaxing.com
2012
-
I don’t understand how to properly export the new davinci settings to the RMD files so Premiere can work with them natively. I tried the “Apply All” option to incorporate the coloring, but it does not appear to have stuck when I reload the R3D from RMD in Premiere.
-
Hi Chris,
Are you referring to taking your grades out of Resolve via RMD to Premiere?
This is not possible because Resolve offers a greater range of image manipulations than RMD supports. So you cannot save all the grading from Resolve to RMD.Remember that you are taking your images from the edit to the grade. After that you are stuck to the format of your internal workflow (e.g. EXR, DPX, ProRes..).
The workflow would be – analogous to Dan’s question – you take your grade out of Resolve in a lossless, high-bit-depth format matching your source material. For example, you have R3D material or VFX shots done in Nuke, and you export your grade to EXR for finishing in Flame.
Second example, you have ProRes sources and keep ProRes 4444 as your format through edit, compositing, grading and finishing.Hope this clarifies things 🙂
cheers
Markus
-
-
Great post!
How do you manage your workflow if you have the edit in AE and use some of the effects there? Once you export the XML, it won’t keep the plugins or effects used in AE, specially when some are native..
Or how does it work when you have for instance transform, scale, etc; and not just your basic trim and edit?
-
Hi Dan,
Thank you 🙂
As you may glimpse from my response to Chris, there is some information that one program can create but that another cannot handle.
In this case, taking plugins or effects from AE requires rendering them to an interchange-friendly format, such as EXR, DPX or ProRes.
Resolve will however handle most information that can be saved to XML, including the sizing information that you mentioned (translate, rotate, scale / pan, tilt, rotate, zoom).
To import this information from your editor’s XML file, in the import XML dialogue in Resolve, just tick the “use sizing information” checkbox.
Be aware though that with different source material sizes (e.g. edit on 720p and relink to 4k for grading) Resolve might not interpret the sizing information in a visually correct manner. Also, there can be problems with horizontal and vertical flip filters that certain editing programs might not write out in a way that Resolve can understand.
In those cases, you will have to manually adjust the sizing information in the Color screen.Hope this helps you find a workflow that suits your AE & Resolve projects!
cheers
Markus
-
-
Hey,
thanks for sharing your workflow.
We’ve encountered a problem though, that you might be able to help us with.We use REDCINE-X for the trimming of the R3D files.
We export our XML from Premiere and import it in REDCINE-X.We export trimmed R3Ds with handles and a XML.
These are the files we are keeping archived, long after the project is done.We also export RedLogFilm ProRes 4444 files (the same: trimmed with handles) for use in Premiere.
These are used for VFX in AfterEffects and grading in Resolve. For performance reasons, we prefer working with ProRes instead of R3Ds at this stage. Qualitywise, it should not make any difference anyway.So next we tried to update our Premiere project with the ProRes 4444 files, and this is where we hit a wall. We tried importing the XML created by REDCINE-X, but the clips were not fully imported, so even though the files on the harddrive did have the handles, we could not access them within Premiere.
Do you have any idea, what we could do to fix this?
Thanks a lot!
Yannik-
Hi Yannik,
thanks for your clear feedback – I understand your workflow, and using ProRes is more convenient on slower systems, though you will not have access to the raw parameters anyone. If your first light from RedCine is properly done, I agree that the loss of quality will be minimal.
I do not work on Premiere and as this might be a problem particular to Premiere i might not be able to help you. But it sounds like a more general workflow problem – maybe more information about your problem will help.
Could you clarify “not fully imported”? Are the media locations linked correctly? If not, are the paths correct in the XML file? Are only the handles missing? What percentage of files is linked correctly? What correlation exists between the correctly linked files?
cheers
Markus
-
-
Thank you for great post!
-
Dear Tamara, thank you, hope it helps in your projects! cheers Markus
-
-
Wondering the best setting for delivering files from Davinci- everything prores washes out my color, RGB 10bit (full data) makes it too contrasty but closer- auto/standard data is back to washed out.- whats the way to get out of the program close to what you have graded?
-
Dear Jason,
there is a number of things that affect the colorspace of your footage. be sure to set input interpretation (especially for raw footage such as RED) and input LUT correctly according to your material. Set output LUT depending on your export needs (usually none). if you export graded RED material with auto and prores 444 you should be getting unscaled, color-accurate video. of course seeing this depends on your player. i recommend importing the rendered footage into resolve and checking in a new timeline if the export is identical to your graded timeline.
cheers
Markus

![A Resolve 9 Red R3D Grading Workflow [guest post]](http://ninofilm.net/blog/wp-content/uploads/2012/10/banner1s-700x325.jpg)












Comments